Phone.com/Configure/Extensions/Call-Back
From PCSAR
(→Call Handling Rules) |
(→Next) |
||
| Line 57: | Line 57: | ||
('''<span style='color: #ba0000;'>A</span>'''). | ('''<span style='color: #ba0000;'>A</span>'''). | ||
| - | == | + | === Destination === |
[[Image:Phone.com call-back extension Call Handling Rules screen labelled.png|600px|right]] | [[Image:Phone.com call-back extension Call Handling Rules screen labelled.png|600px|right]] | ||
You can now enter the new number you want the Call-Back number to be forwarded to. | You can now enter the new number you want the Call-Back number to be forwarded to. | ||
| Line 109: | Line 109: | ||
Call in to the Call-Back Number (403-627-5804) from another phone | Call in to the Call-Back Number (403-627-5804) from another phone | ||
and check to see whether your change to the destination number is working. | and check to see whether your change to the destination number is working. | ||
| + | |||
== Help == | == Help == | ||
Phone.com provides | Phone.com provides | ||
Revision as of 23:59, 20 March 2018
Pincher SAR uses both Telus and Phone.com to make remote changes to the Call Back destination possible.
Caller
  |
  v
403-627-5804 (Telus)
permanently forwarded to
  |
  v
587-315-0065 (Phone.com)
forwards to
  |
  v
Manager(s)/Call-Back Person
(We used to be able to do this with just Telus, but they no longer offer the Advanced Call Forwarding feature we relied on.)
Contents |
Changing the destination phone number
Login
You can change the destination phone number by going to:
https://control.phone.com/login?role=voip
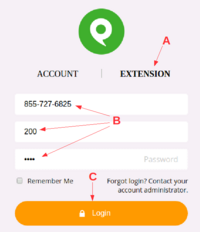
Click on the word EXTENSION (A).
Enter
- Phone number: 855-727-6825
- Extension: 200
- Password: XXXXXX
(B).
Get the password from this link, another search manager, call-back person or the Technology Committee. (It's not printed on this public page because it could be abused.)
Click on Login
(C).
Main Screen
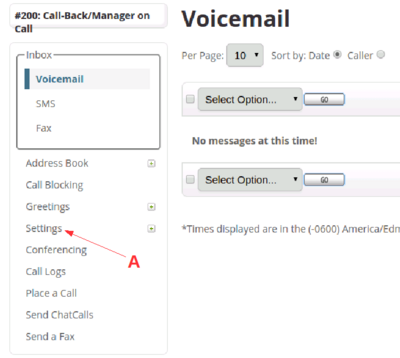
Once you're logged in you'll be shown the main screen for the Call-Back extension.
On the left side there's a menu.
Click on "Settings"
(A).
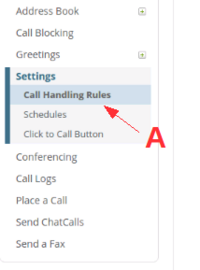
Call Handling Rules
On the left menu under Settings, click on Call Handling Rules (A).
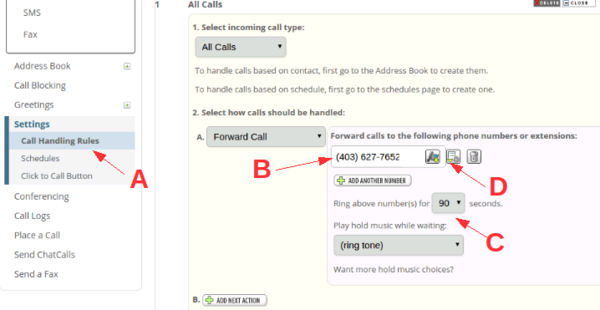
Destination
You can now enter the new number you want the Call-Back number to be forwarded to. (B).
Make sure the "Ring above number for" is set to the maximum 90 seconds (C).
Click on the gear icon for Advanced Configuration
(D).
Advanced Configuration
The display will expand to show you the advanced configuration.
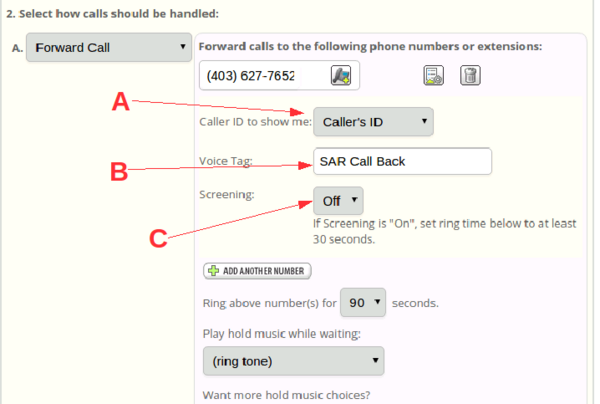
Set "Caller ID to show me" to "Caller's ID" so your phone will show who's calling (e.g. the RCMP) (A).
Alternatively you can set it to "Called Number", if you want to set a special ring tone on your phone for calls to the Call-Back number. The number that will show up will actually be 587-315-0065 rather than 403-627-5804 because of our two-step call forwarding configuration.
Set "Voice Tag" to something you'd like the phone to say when it calls you. I use "SAR Call Back". Or leave it blank if you don't care (B).
Set "Screening" to "Off" to have the call go through immediately when you answer (C).
If you set it to "On", you'll hear a message like:
Hello. Call from 587-315-0065 to "SAR Call Back". Press 1 to accept or 2 to ignore.
This can be useful if someone else (or an answering machine) might answer your phone and you want the caller to just hear ringing if it's the wrong person.
Save Settings
When you make changes, click on "Save Rule Settings"
(D).
Test
Call in to the Call-Back Number (403-627-5804) from another phone and check to see whether your change to the destination number is working.
Help
Phone.com provides online help in the menu at the top of its pages under "Support".
You can read further about our use of phone.com here.
Advanced
Phone.com has lots of features and can do just about anything you can imagine a phone system might do. See the online help or talk to the Technology Committee if you'd like to explore them.
If you're using a complex setting, you might want to save it for the next time you're responding to the call-back number. We can set up a special extension for you so you don't have to reenter the same configuration.
